How To Build Your Own Deer Cooler

The finished cooler ready for opening day
I first got into hunting deer in the 1990s and back then my friends told me that it was good to hang a field-dressed deer outside for a few days to allow the meat to get more tender. I didn’t take this as an absolute, I can remember taking some deer to the butcher soon after I harvested them, but I certainly did not feel that time was of the essence if the weather was cool. I got a fun Christmas card picture with my kids on the swing-set in the back yard, next to a buck also hanging from the swings. We used to hunt on an island only accessible by ferry, and hang our deer in a tree until it was time to go home. I do remember one time when I shot a deer at the end of the day during the expanded archery season in Maine and waited to track it until the next morning - by the time I found the trophy buck and got it to the butcher the day was warm and sunny. We ate most of it, but I finally couldn’t take the smell and taste anymore and pitched the last few packages.
I have done research on the proper way to age meat, and you really can’t do it yourself unless you have a cooler. The temperature needs to be held constant between 33 and 39 degrees, so hanging your deer from a tree just doesn’t cut it. The experts say that dry-aging beef should be done at 34 degrees, but my goal isn’t to leave the deer in my cooler for weeks - I just want to get it cooled down fast and take it to the butcher when I can. I want to keep it fresh for a day or two at most.
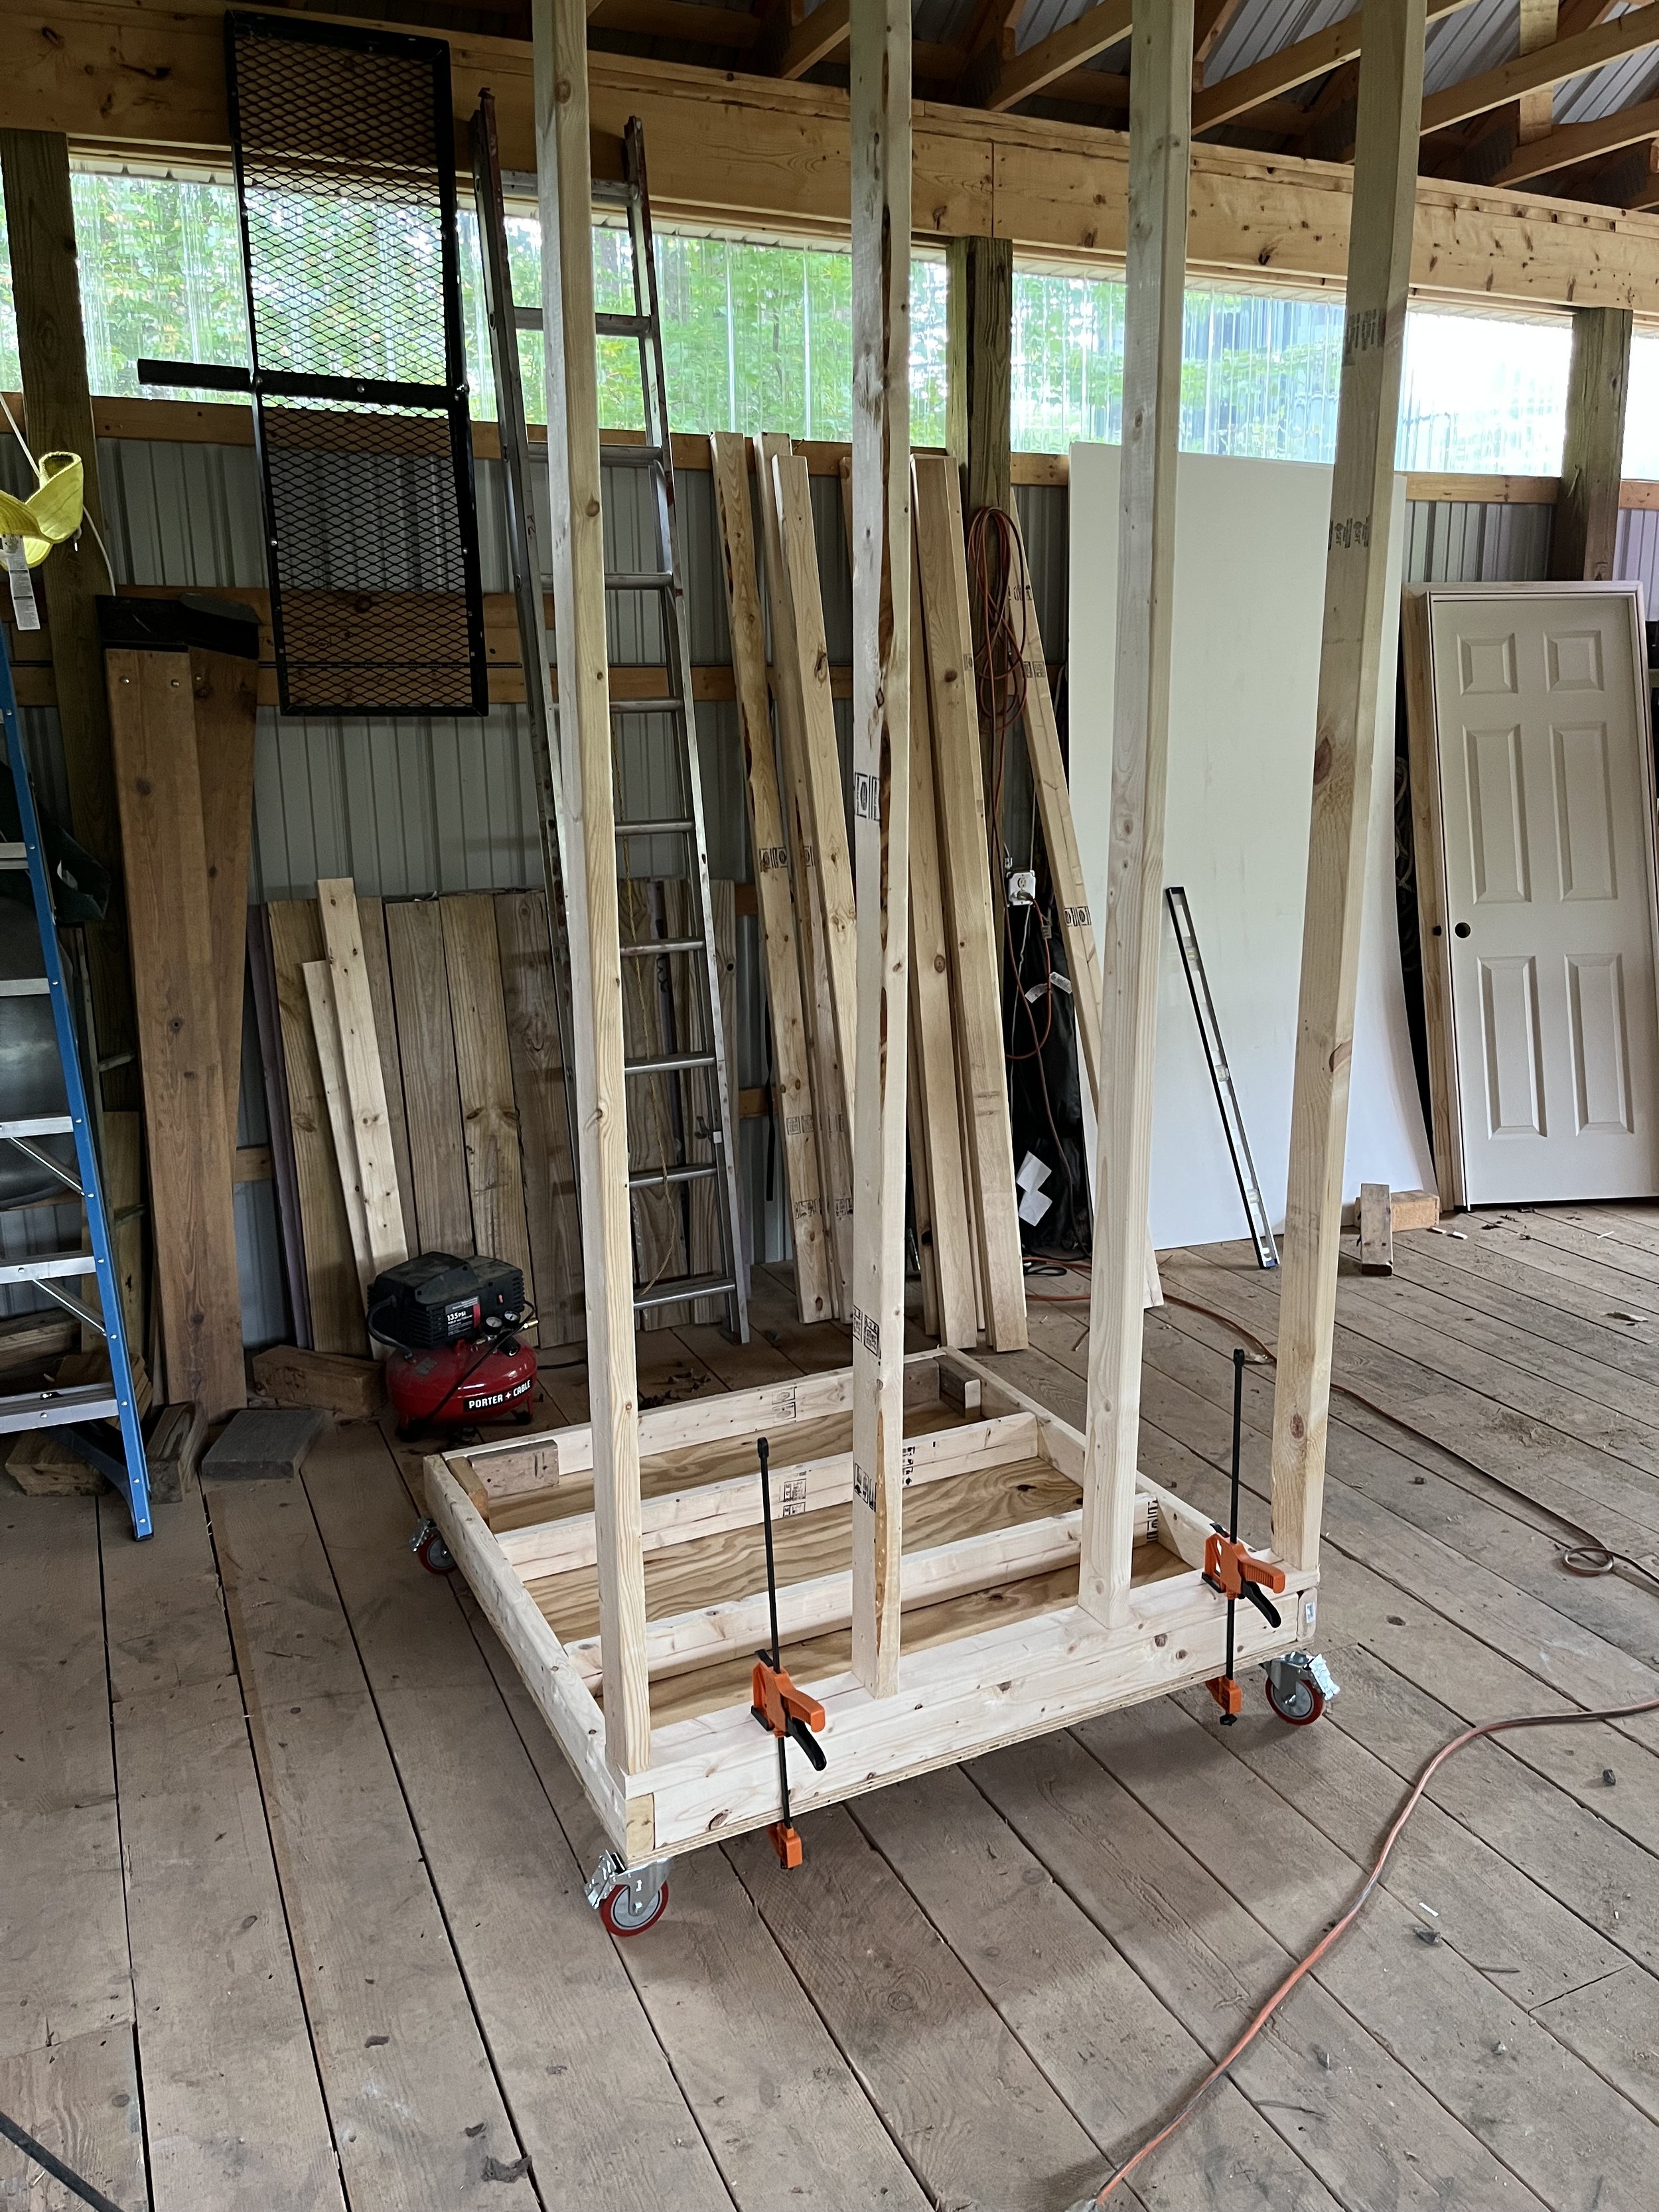
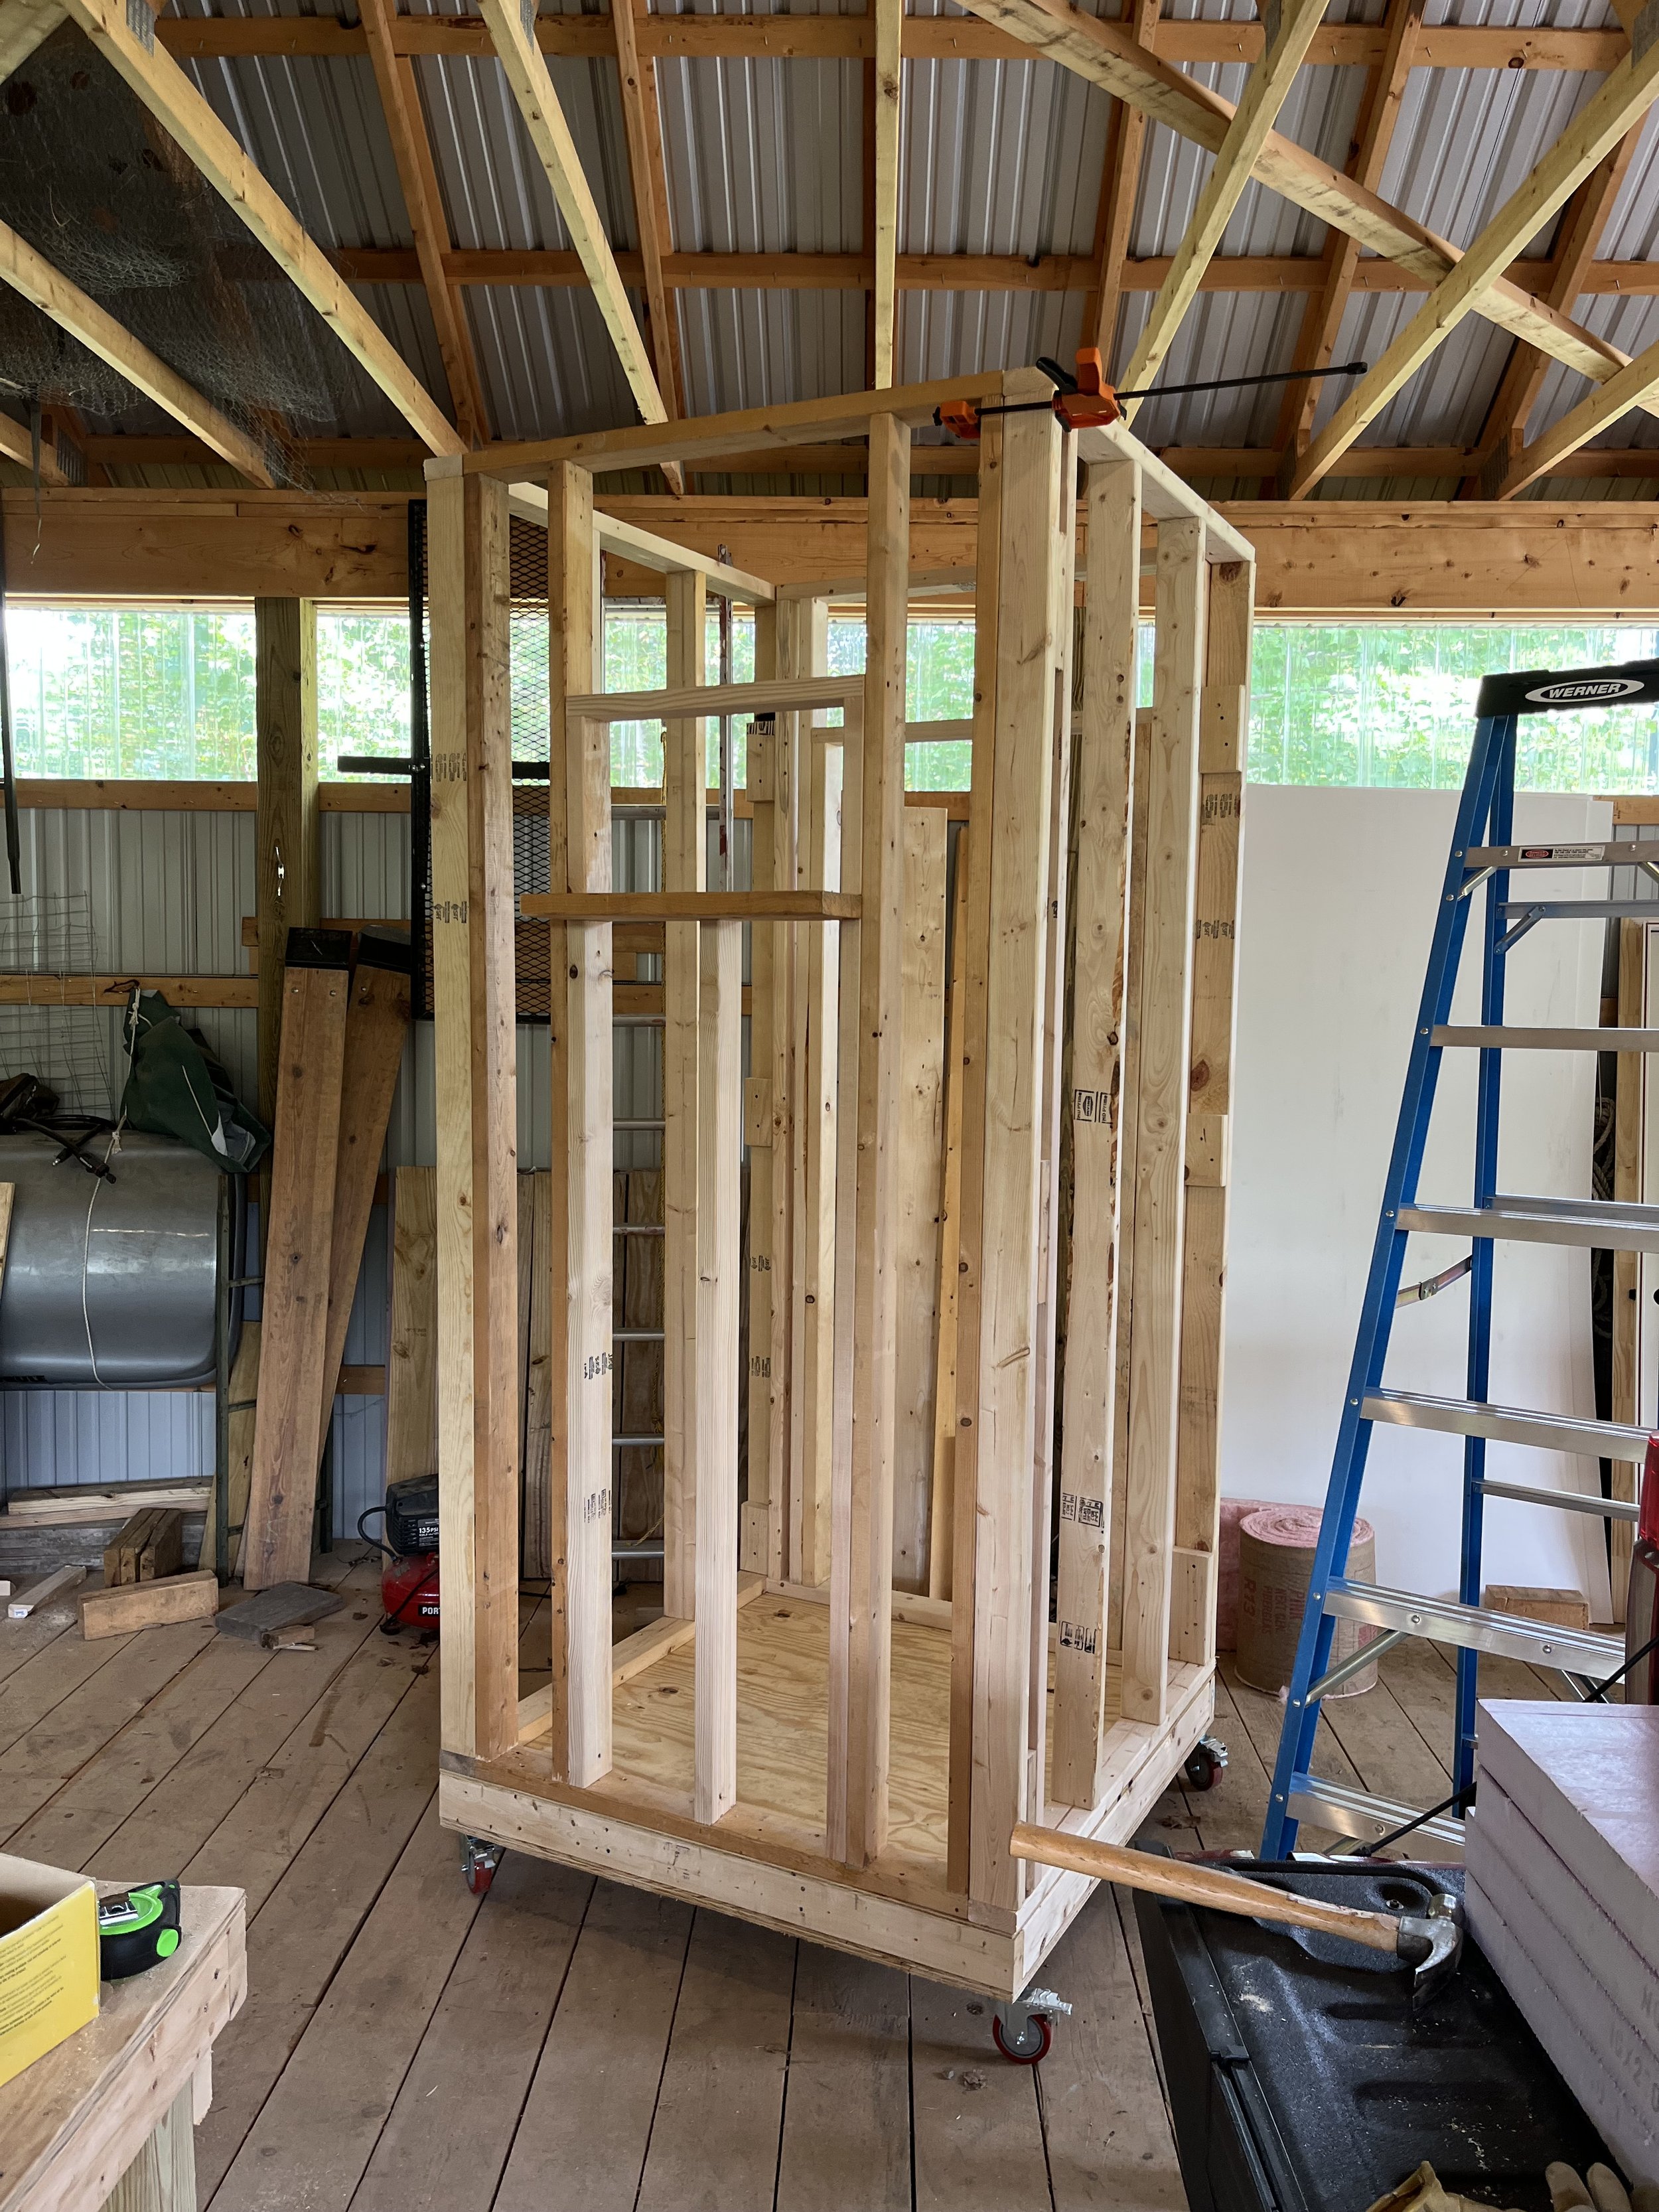
Start with 2x4 framing
I give a lot of venison away to non-hunting friends and they tell me that it tastes great - not gamey at all. With decades of experience, I think this is primarily because I get my deer cooled-down fast. I usually take my deer to the butcher just as soon as possible and he will age it in his cooler, but during the early archery season it is often very warm out, and it gets dark late, so I’m hunting late. The problem is that I’m rushing around after the tagging stations are closed and maybe after my butcher is done for the day. As I well know, if that deer sits around in warm weather it will quickly spoil - and that’s not fair for the deer, you, or to another hunter that would love to have that meat.
The solution? Build a cooler large enough and cold enough to hold a deer or two overnight.
Everything you could possibly want to know is on the Internet, right? So I spent weeks searching for how to build a deer cooler. I found the ArcheryTalk discussion group thread on this topic and that had lots of information. Storeitcold.com sells CoolBot temperature controllers, as well as AC units, turnkey coolers, and has a bunch of information to help you figure this out. And there are several other sites and YouTube videos that cover the topic.
The whole thing is on casters
Most of the information points back to using the CoolBot temperature controller to trick a wall AC unit into cooling the space down to temperatures well below what a normal home air conditioner is usually used for. So I committed to the project by buying a CoolBot controller, as well as a window AC unit made by LG and sold on the Storitcold.com website. The site has a calculator where you input the dimensions of the cooler and they recommend the size AC unit to cool that space.
I didn’t want to commit to a cooler that would be built into one part of my barn and not be able to be moved around if I needed, so I started with heavy duty casters that can be locked - I bought them from Amazon and have used them in the past for a workbench. I mounted them to thick plywood and started the framing on top of that base. I insulated between all the framing with fiberglass as I went along. I also framed-in a “window” up high on the side opposite the door that I would use to hold the AC unit.

The first level of insulation is pink
I wanted a smooth interior surface that would be easy to clean, so I was happy to find 4x8 sheets of 6 mm white PVC at Home Depot. The PVC is easy to cut with regular power tools and I just screwed it to the studs on the inside. When you cut it the dust produced seems to be fairly toxic, but an N95 mask easily protected me.
The insulation is obviously an important factor. Since you’re trying to keep the warm air out, rather than keeping the heat in as you would with a house, it is the reverse of what you are used to - instead of losing heat through the roof, the problem is losing cold through the floor. So making sure that the floor and lower parts of the cooler are well insulated, and air tight, is the priority.

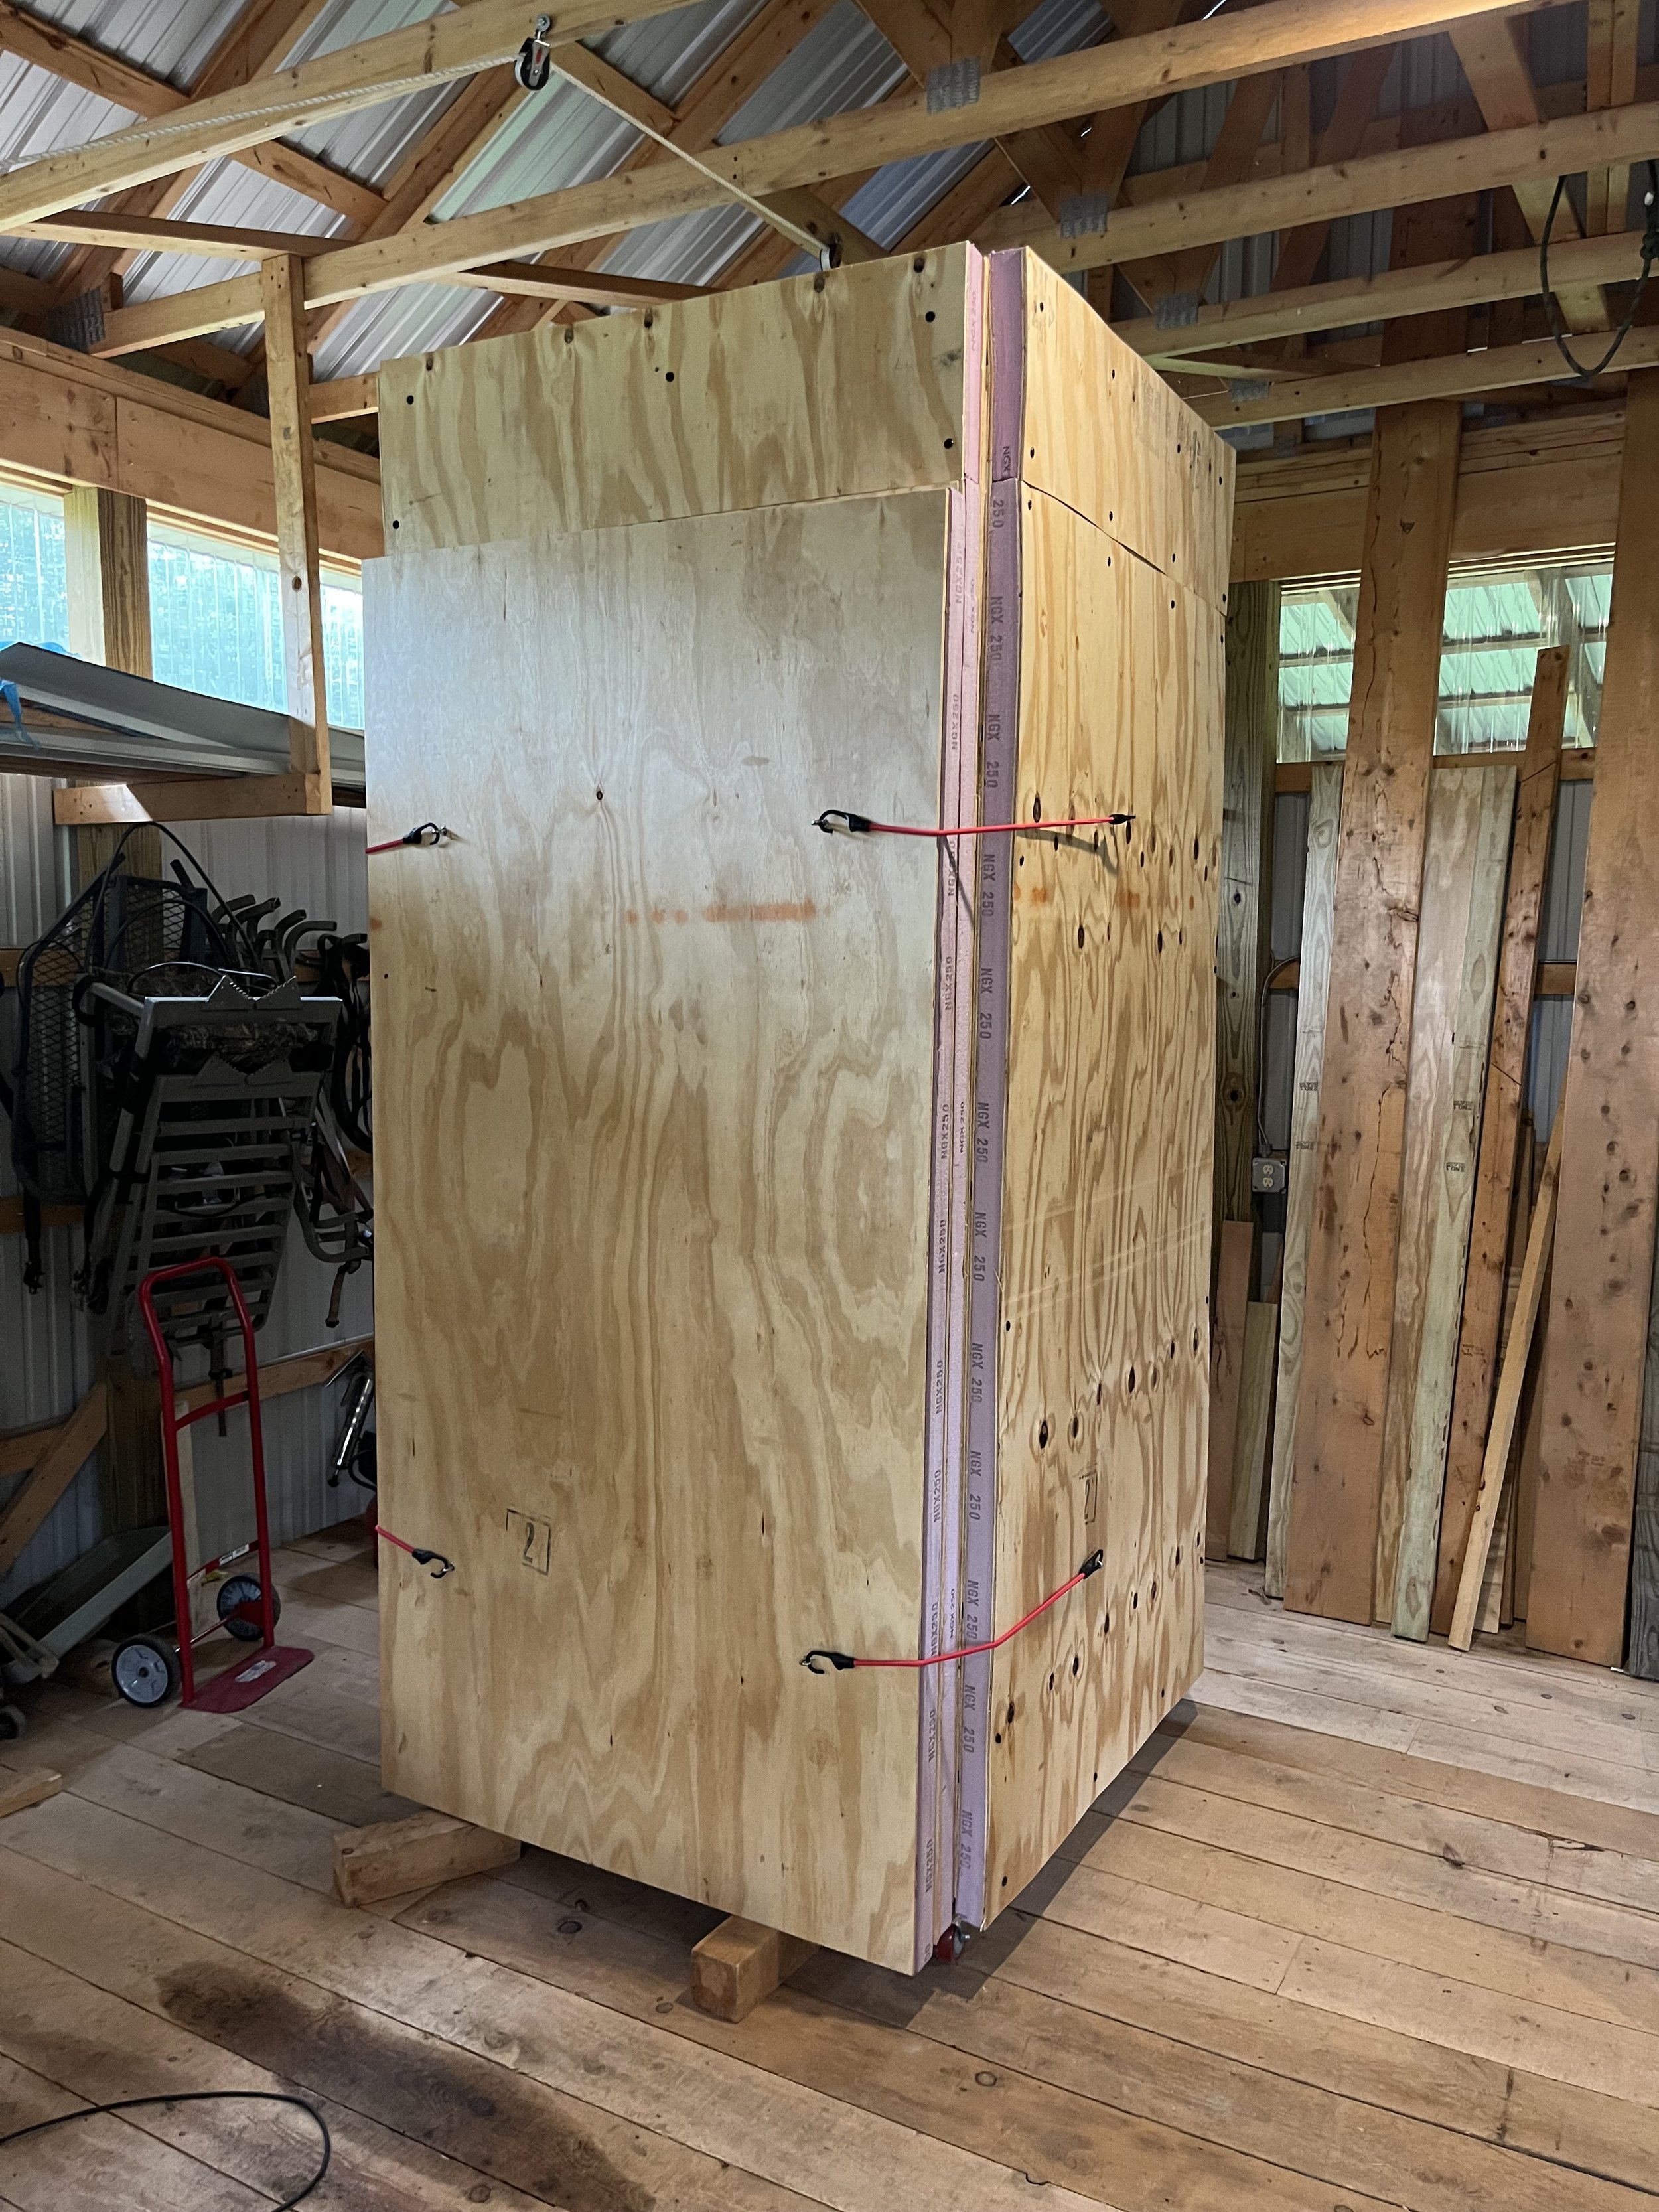
Plywood secures the foam board
Storeitcold.com recommends an R value in the walls and floor of 25, and to not use fiberglass batt insulation. They say that moisture from the warm outside air will condense into the fiberglass batt, mold will grow, and the insulating properties will degrade. Instead, they recommend rigid foam board or spray-on foam insulation. Since my goal is to chill a deer for a day or two, and my cooler will not be operating for most of the year, I felt that I could go for a slightly lower R value, and I could use some fiberglass in the spots that it would be best suited. If I was building a cooler for regular daily use I would have changed my design.
I used Owens Corning pink fiberglass insulation in rolls, and combined it with 4x8 sheets of rigid foam. The fiberglass was rated at R13 and the foam boards at R10, so I would be close to the desired R25, though I recognize that the studs would lower the overall effectiveness - the foam boards would go over the studs to reduce the “thermal bridging.” Making the cooler airtight would be extremely important, so I worked to make that a priority.

CoolBot controls the AC unit
I bought a cheap pre-hung door and installed it - it was a solid-core interior door, not an insulated external door - that was a mistake - I would choose an insulated door if I had to do it again. I used a can of spray foam to seal the cracks around the door and insulated all the other gaps in the walls with fiberglass batt. The interior was sheathed in the white PVC and I caulked the joints with silicon as needed.
I played around with ways to attach the foam boards on the outside, settling on screwing plywood through the foam to the studs using long HeadLOK structural wood screws. My design called for an insulated deck on casters, stud walls screwed to the deck, and an insulated cap screwed on top - making for the interior height to be 8 feet, but the exterior to be over 9 feet. I had to piece the plywood and foam board to cover the entire height, and the joints in the plywood/foam barrier would be at the top to make the critical lower portion’s insulation continuous.
The AC unit went into the rough opening and was shimmed to be tight. I ran the power cords for the AC and Coolbot through the space between the AC unit and rough opening so they would be plugged-in outside the cooler. I used the canned foam to seal the cracks around the AC unit, and mounted the CoolBot to the interior wall.
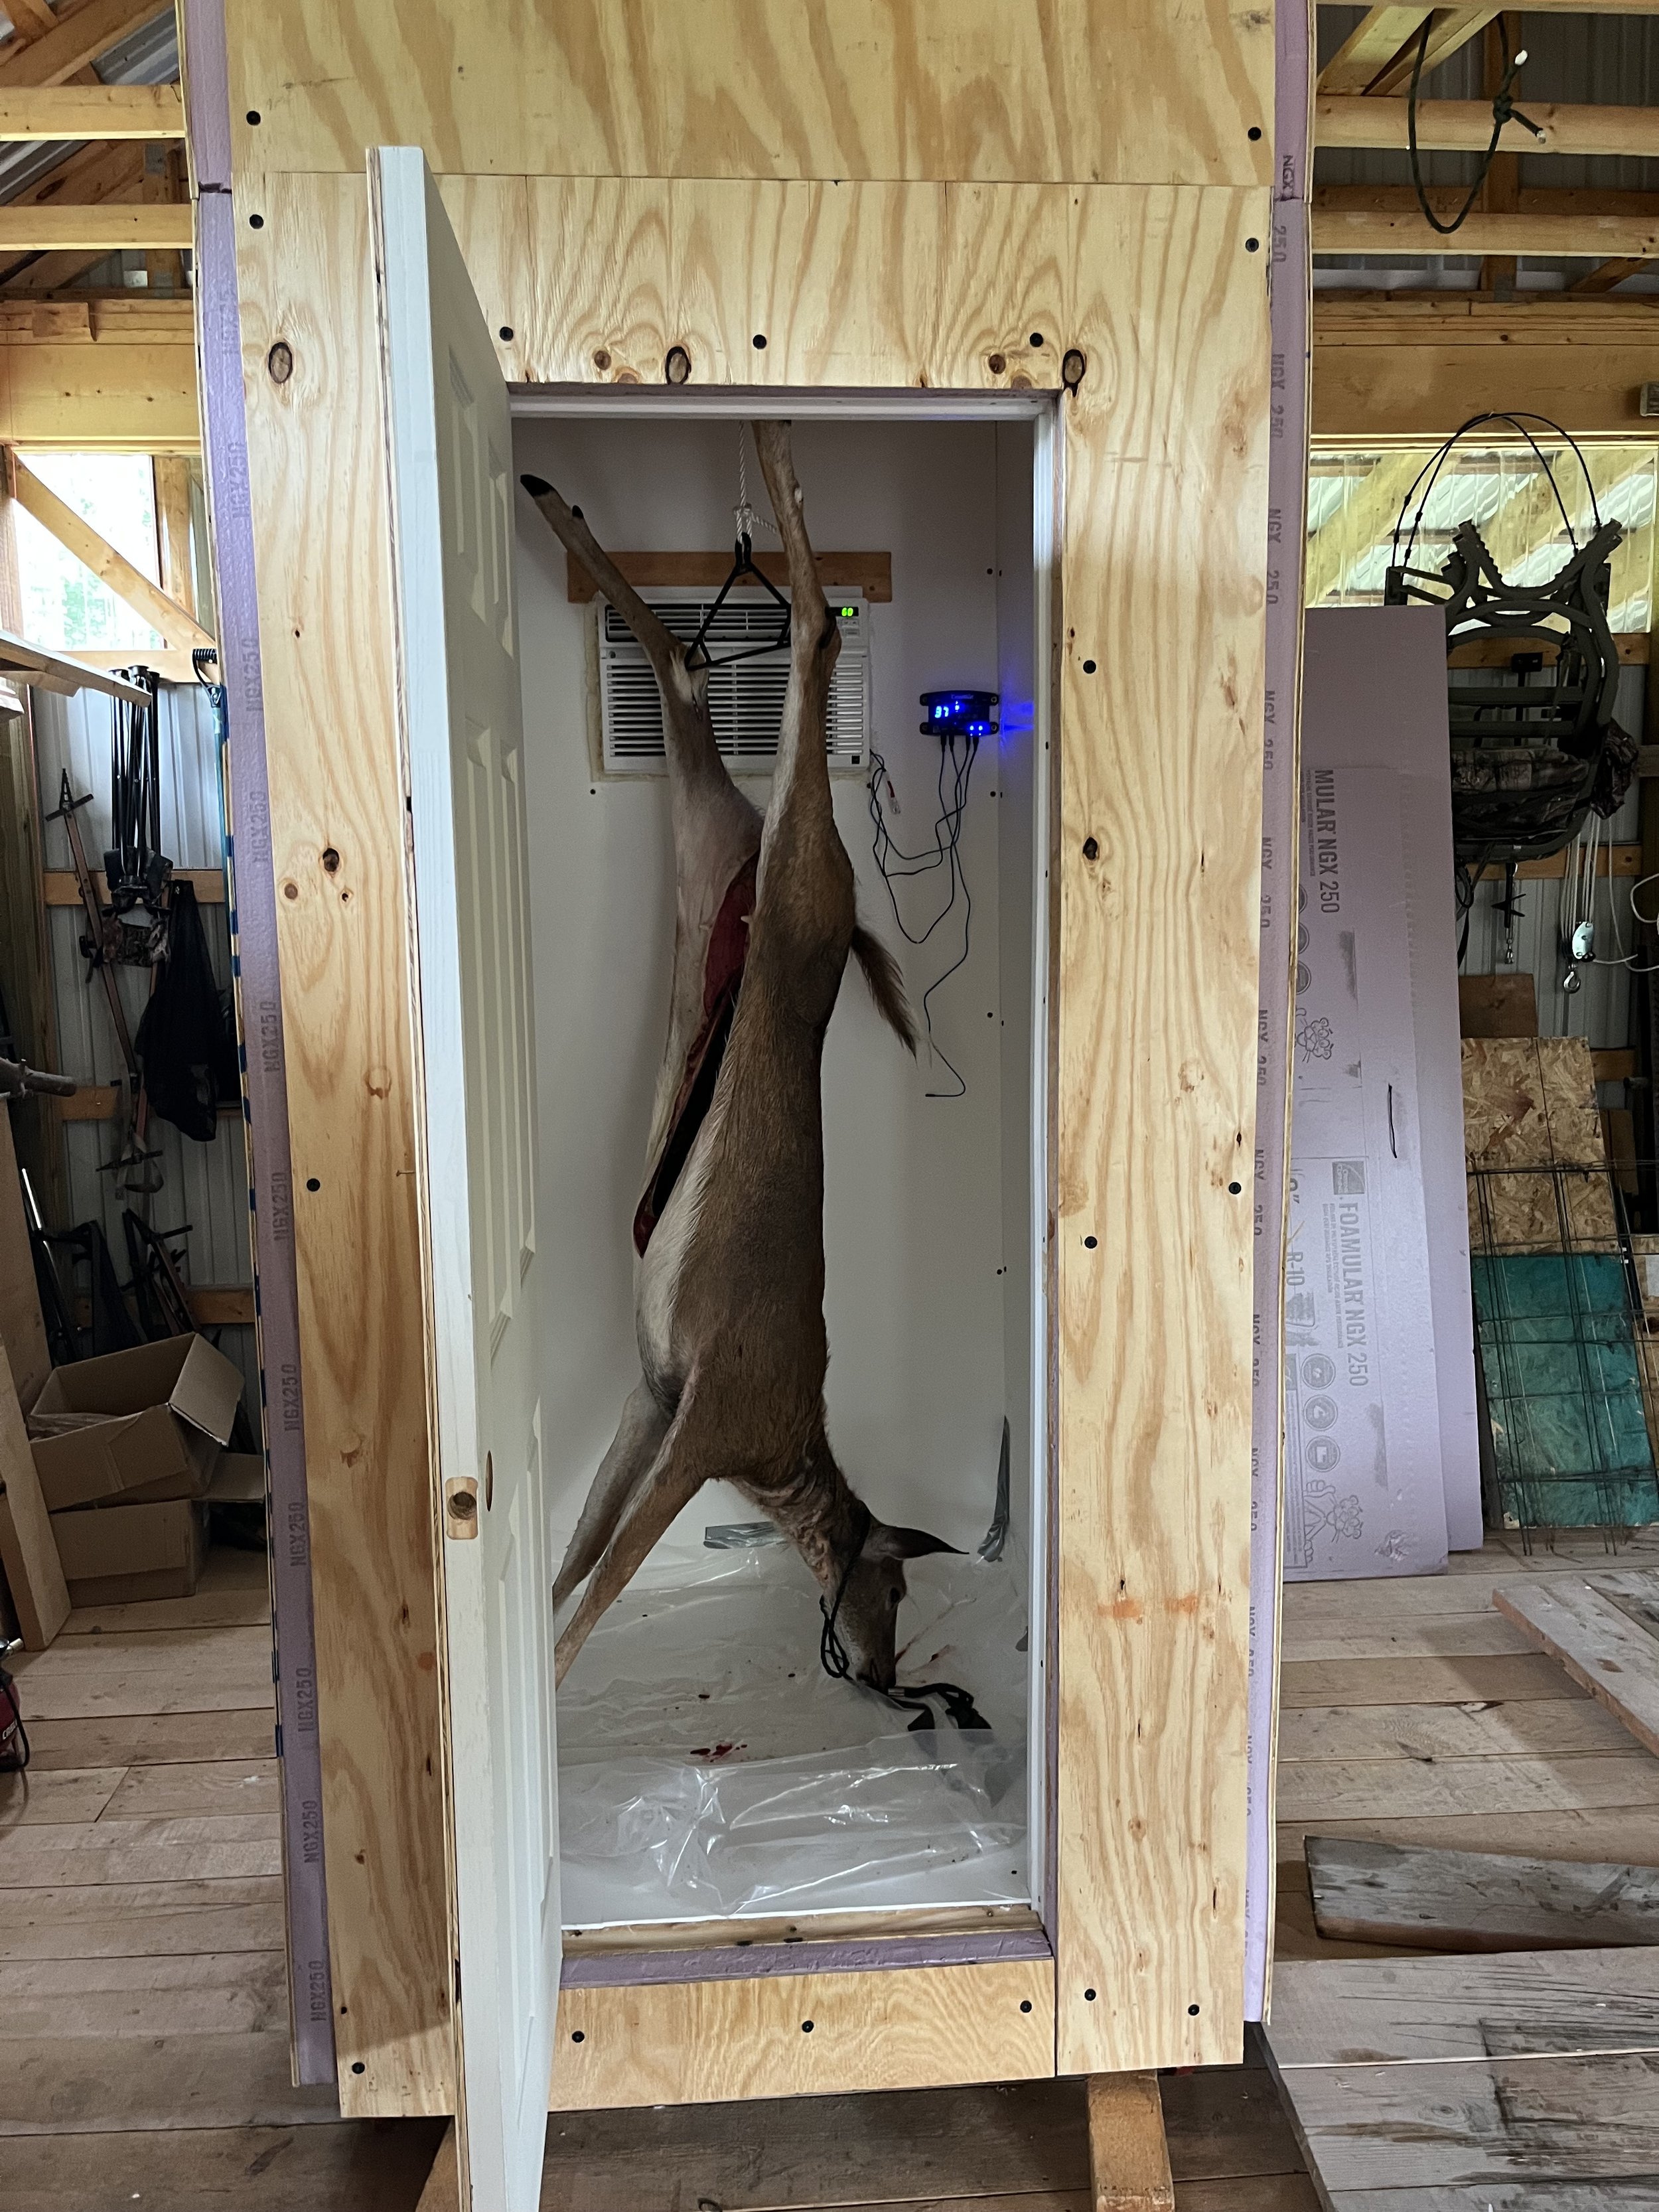
First doe after a night in the box
Using the Coolbot to control the AC unit is straightforward. They offer a few models, including one you can control via wifi, but I opted for a simple version where I can turn it on and off and set the temperature manually. The instructions are easy to follow, and the way it works is to take the AC unit’s temperature sensor and attach the CoolBot heater cable to it so the controller can make the temperature sensor think the room is warm and the unit needs to keep running. The CoolBot controller has a sensor to tell how cold the cooler is, as well as a sensor to measure the temperature of the AC unit. You input your desired temperature into the controller and it does the rest. There are other controllers on the market, but CoolBot seems to be designed just for what I want to do.
I couldn’t think of a way to effectively insulate the door, as well as the wall that the door is mounted in, and still be able to easily open and close the door without letting warm air inside. If you were using the cooler regularly for most of the year, you would want to take a different approach and be sure to have a well insulated door. Instead, I used the same foam and plywood approach on the wall around the door, and then I shaped a piece of foam that would easily go into the door area. When the deer is hanging in the cooler, the temperature is all set, the door is closed, the foam piece is popped into the door area, I then put a full sheet of foam on the door side and a full sheet of plywood to cover the foam, holding everything in place with bungie cords. Pieces of 4x4 on the floor hold the foam and plywood off the floor at the right height while I hook the bungie cords. It sounds like a crappy design, but it actually is very easy to put together and it works well.
My system to pull a deer up and into the cooler consists of a gambrel connected to a rope that runs through a hole in the top of the cooler, up to a pulley in the barn rafters, over to another pulley, and down to the barn floor. With two holes through the leg tendons, the deer is hooked to the gambrel and the rope is run to the front bumper of my UTV. By backing the UTV up, the deer is pulled up into the cooler. Fast and easy.
On the first day of the 2022 Maine Expanded Archery season I was hunting in a box blind right next to my barn. It was 83 degrees that afternoon, and the temperature in the blind was much hotter. I was soaked in sweat when the first deer came into the food plot, and it was still warm when I harvested a mature doe. (Click Here and go to the bottom of the page to read about that hunt) By the time I recovered and field-dressed the doe it was dark and all the tagging stations were closed. I dropped the doe onto a blue tarp in the barn and dragged it over to the cooler. I hooked the doe to the gambrel and pulled it into the cooler.
The deer spent the night in the 37 degree cooler, and in the morning I took it to the tagging station and then on to the butcher. The meat was perfect, and I wasn’t running around at night trying to find a cooler. My DIY deer cooler was a huge success!